- In Fun You Trust ? Contactez-nous et rejoignez la communauté Be My Nounou
- 09 84 34 50 07
- contact@bemynounou.com
Selection of fun thanksgiving activities
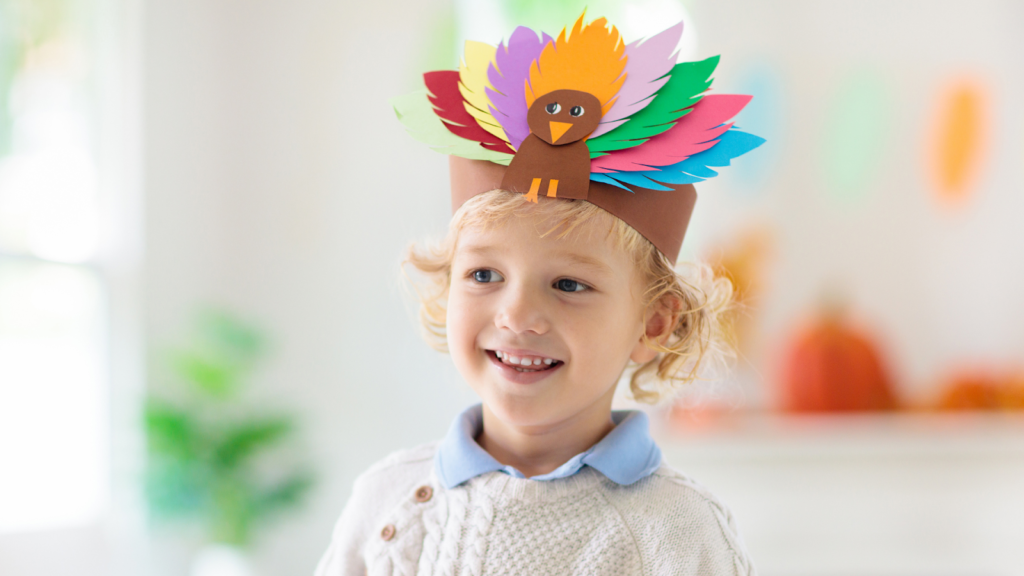
Thanksgiving is fast approaching! Famous American tradition, the inhabitants commemorate the arrival of the first Pilgrims immigrants in America, today considered as the founders of the United States. For this occasion, Be My Nounou suggests 4 activities to do with your children.
The objective is to allow them to learn more about this celebration but also to use their creativity through the implementation of manual activities.
Pilgrim Craft
You need :
- Colored cardstock or construction paper
- Glue
- Scissors
- Pilgrim template
How to do :
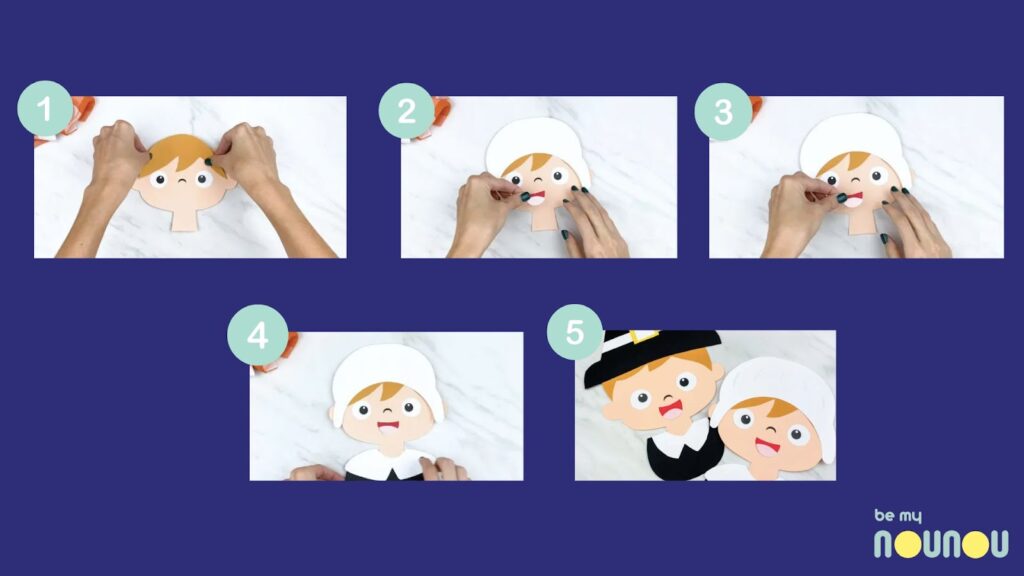
Step 1: Download the pilgrim here, print and cut out the pieces you want to use.
Step 2 : Take the eyes and glue them in the middle of the face, on either side of the nose.
Step 3 : Glue the hair just above the eye line, in the middle of the head.
Step 4 : For the girl pilgrim, glue the front of the bonnet to the back of the bonnet. For the boy pilgrim, assemble the hat by gluing the hat decorations together and then gluing the band to the hat.
Step 5 : Take the completed bonnet or hat and glue on top of the pilgrim’s hair.
Step 6 : Make the mouth by gluing the tongue to the mouth and use scissors to trim off the excess. Glue the completed mouth in the middle of the face, just under the nose.
Step 7 : Finish off the pilgrim by gluing the collar to the shirt, then glue this completed shirt to the front of the pilgrim’s neck.
Turkey Corner Bookmaker
You need:
- Turkey Bookmark Template (next page)
- White paper
- Scissors
- Glue
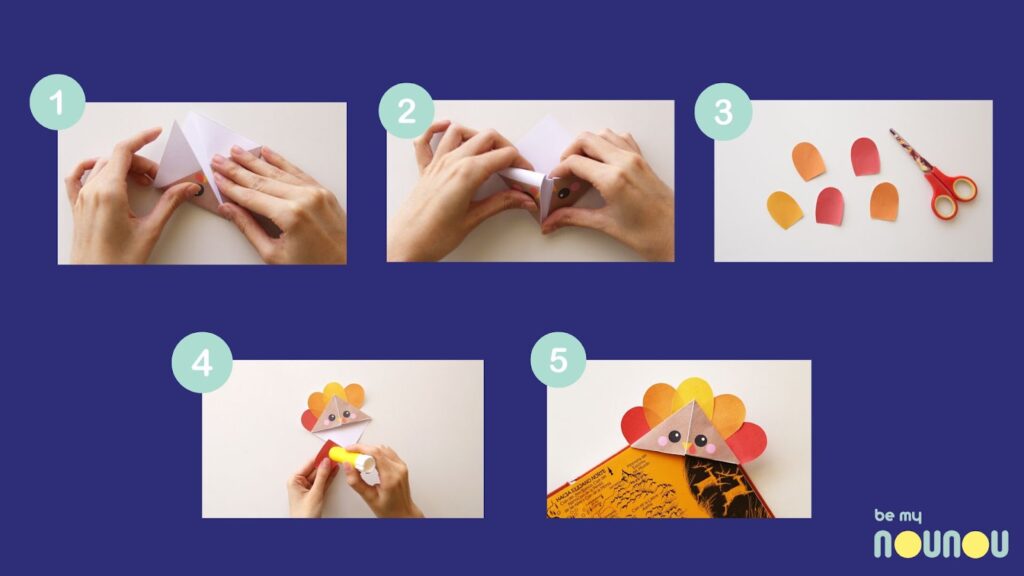
Step 1: Print the turkey bookmark template here.
Step 2 : Cut the square and fold it into a triangle making sure both parts of the turkey are on the same side. Crease well.
Step 3 : Turn the triangle over and fold the right corner towards the middle. Do the same with the left corner.
Step 4 : Unfold both corners and fold the top layer of the triangle to the bottom.
Step 5 : Tuck the flaps that we created in step 3 into the pocket created in step 4.
Step 6 : Cut the five feathers included in your template.
Step 7 : Glue the feathers behind the bookmark starting with the yellow in the middle, followed by the orange feathers, and the red ones.
Popsicle Stick Easter Bunny Craft
Step 1: Line up 4 regular popsicle sticks together
Step 2: You can add 2 mini craft sticks to the back to glue the 4 regular popsicle sticks together. Or you can cut regular sticks into small pieces and glue them to the back.
Step 3: Paint the top of the popsicle stick brown on an angle where you want the brim of the hat to go.Paint the next area light brown. Add a slight curve where the face ends on the bottom of the face.
Step 4: Next, paint another color underneath. (The orange and blue area)
Step 5: Glue strips of yellow paper to the edge of the dark brown paint on both sides for the hair. The top part will be hidden when you add a mini stick on top for the brim of the hat.
Step 6: Paint 2 mini sticks dark brown.
Step 7: Glue the mini stick on a corner to make the brim of the hat, making sure to cover the top of the yellow cardstock.
Step 8: Glue 2 small eyes wide open. Make the nose with orange cardstock and glue it on.
Step 9: Draw the mouth with a black marker.
Tepee Cupcakes
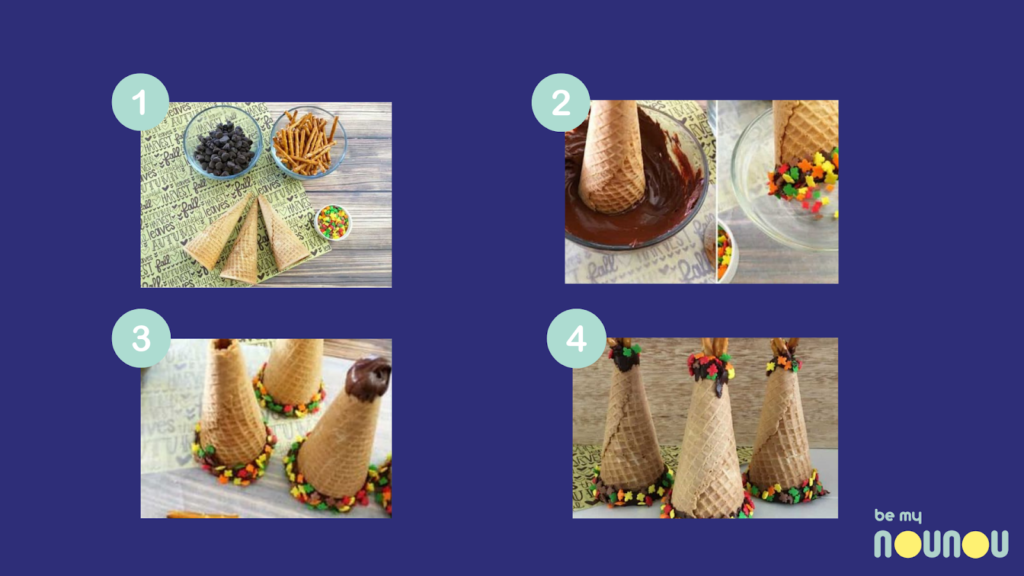
Ingrédients :
- Sugar Cones
- Leaf Sprinkles
- Pretzel Sticks
- Chocolate Chips
Step 1 : Line your working surface with a piece of parchment paper.
Étape 2 : In a small microwave safe dish, heat your chocolate chips on 50 percent power for 2-3 minutes, stirring every 30 seconds until melted.
Étape 3 : Carefully break the tips off of your sugar cones, just big enough so that you can fit one or two pretzels inside.
Étape 4 : Now hold the tip off your cone and dip the bottom into your melted chocolate, just enough that it will cover the edges.
Étape 5 : Then set on your parchment paper and sprinkle your leaf sprinkles onto the melted chocolate.
Étape 6 : Carefully hold the center of your cone and dip the opposite side into the chocolate.
Étape 7 :Carefully hold the center of your cone and dip the opposite side into the chocolate.
Break three pretzel sticks into three different sizes, dip the ends into your chocolate, and stick them onto the top of your cone teepee
Étape 8 : Sprinkle a few more leaves onto the top.
Étape 9 : Carefully transfer to the freezer for about 15 minutes to harden the chocolate.
